Saturday, June 30, 2012

Deco-Nerd: Creating Artwork for the Technical Home

Inspiration: 
I've recently moved back to my condo in Dallas. After unpacking I noticed something missing... artwork. Of course, walking around shops , art stores and on the internet-- I couldn't find anything that I really liked.  My home is a cross between Shabby Chic (although I like to call it Shabby Geek) and a Museum book/gift store (all of the traveling I've done I've collected a lot of keep sakes). So I needed to find artwork that complimented this.

I had found some pieces I had really fallen in love with at Restoration Hardware.
IN particular the maps and the Blueprints! But looking at the price tag... I nearly had a heart attack.

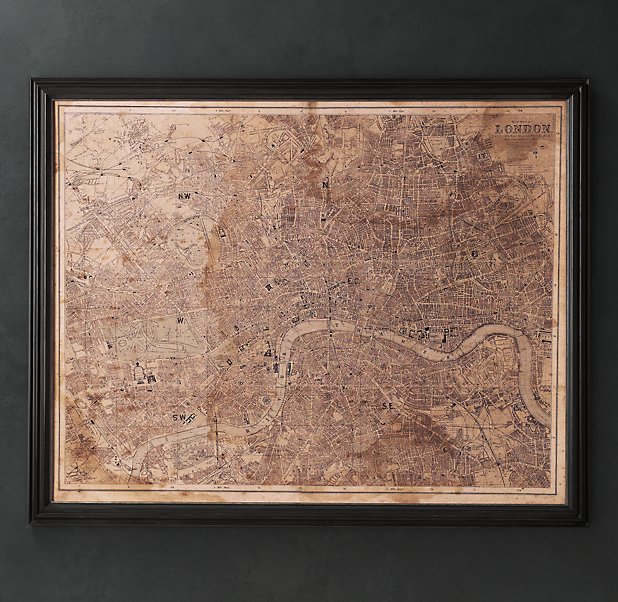
Plus, it wasn't the exact map that I wanted...

Overall Concept:
Be able to create large artwork for hanging that didn't cost over 50.00 unframed.

High Level Things to Consider:
 Where to get a large image?
Once you got it, how to get it up without needing expensive frames or printing.
Technique.

Where to get the large image?
I have had a variety of poster ideas stashed.
Mostly keeping them for work (previous post about getting Marketing into Universities), but a lot of times when I see a really neat T-Shirt, Postcard... I think how neat it would be to be a large poster.

I always gravitate to Posters that are both useful... and make me smile when I see it.


or one of these:

I adore Deviant Art, there are a lot of art enthusiasts on there-- if you ever want something really neat and unique, go there... make sure to show your support and to LET THEM KNOW that you like their art! Search Terms: Schematics, Blueprints, Maps, Movie Titles or Character Names.


Whatever the image I chose I needed it to be:
at least 450DPi (Dots per Inch)
Saved in a format that didn't compress too much of the information.


Luckily I have photoshop.


Where to get it printed:
Now that I had images I was interested in, I had to get a physical copy of it. 
I first went to Zazzle.com or Art.com to price out how much it would cost to do an "official" photo. 
Upwards of 300.00 for anything over 24", so that was out of the question for me. 
What I did notice was that I liked how the Canvas looked even though it wasn't framed.


Canvas at Michaels and Joann's is always on sale-- and I hadn't seen many that were over 30.00... plus I didn't need to frame it to get it on the wall!

The Engineering Print:
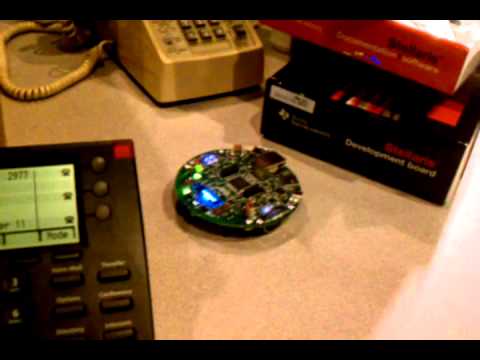
I had gotten large chip schematics printed at Staples before for work. I decided to try that avenue and found the following:
Large Prints for Colour cost: 40.00 and can get up to 36" x 24"
Engineering Prints can get up to 48" x 36" and only cost 5.00. The difference was paper quality and that Engineering prints had to be black and white only.

So I found an image that would be a good trial:
The Soyuz Rocket- Blueprint- I had spent an entire two weeks in NASA in high school broadcasting for the JASON PROJECT (wonder if that is still around?) and got to spend a lot of time in one of the older rockets. 


I loaded it and got it printed.
6.00 later for two prints -- I had it printed in both black with white then inverted the image in PhotoShop and sent it in for White and Black. I wanted to compare. 


I chose the black background and white images... I felt it was more Russian (I did this later with the Comodore 64 Schematic and chose the white, looks about the same). 

Then, I found a matching Canvas size. 24 x 36
Trimmed the print.

Then gathered the material:


All you really need is the print + Canvas + Modge Podge or some Gel Medium and an applicator.

If you want it to lay down better, with less air bubbles, I'd start from the top of the print and work your way down. Glue the back to the canvas, then cover the front to seal it in.


If you notice, there will be little air pockets here and there.
I rather liked the textured look, but if you don't like it, you need to work in slower batches, squeezing out the air packets before moving forward. I would do just one side first, let it completely dry and then glue the rest down.
Alternatively, you can piece your image together in pieces (just be careful that you may have seams).

Notice the seam half way down the image?

Once you get the entire print glued down and dried... then you can work on painting the edges.
Since my photo was black I just wanted to cover my edges with paint.

This gave the canvas + Print a gallery look to it.

So now I have custom art work that is perfect for my house! :-)


If you are interested here's a dropbox link for other posters that I was thinking of doing/done.
https://www.dropbox.com/sh/xbj3a4w3mxsdcxh/e5bKpkBvfk

enjoy!

Tuesday, June 26, 2012

Strength's Finders Books

I have a series of books that have provided the most profound impact on the person that I am.
One of the books that has greatly influenced my approach in anything is the Strengths Finder books.


The major point of the book is to speak about an approach that comes from a position of strength rather than one of weakness. A variety of analogies are used, but the basic assertion is :
[any improvement effort should come from a place that works with your most dominant characheristics rather than trying to simultaneoously juggle changing yourself as well as driving a result]

In particular, the examples given cover management of people.
The book's format includes:
-The overall premise for the book
-The discussion of the 34 character categories
-Test for your current status
-Explaination for your results
-Suggestions how you can motivate yourself and how people can work with you (use case).


What makes me love this book so much is how this is applicable in so many different areas.
Example:  When I am crafting a marketing strategy:
-Establish an overall premise (what am I trying to achieve)
-Understand the different audiences and use cases(Categories)
-Find and establish position (understand the strengths and weaknesses of our position)
-Create a list of value propositions that assist in your overall message...
-Obtain suggestions and testing of concepts
-Go into Marketing Campaign Creation--

It's the understanding what our current value proposition (strengths) are that helps the messaging and consistency of the overall message goal.
If the things that are part of our current value proposition are in conflict with the message we are trying to convey-- then we have two choices.
1. Change the message
or depending on the importance of the message...
2. Change the mechanics to alter a value proposition.

It's far easier and more natural to work with a system, rather than try and make it do something it wasn't designed for. But if you want to change a system's function-- sometimes it's better to stop the system's functions and do the work required-- rather than try and change it on the fly. 

So, if you get a chance, check out the book and take the quiz.
I'd be interested to find out what anyone else thought of their results.


-----
The Clifton StrengthsFinder For L.Swanland
As you may know, the Clifton StrengthsFinder measures the presence of talent in 34 categories called "themes." These themes were determined by Gallup as those that most consistently predict outstanding performance. The greater the presence of a theme of talent within a person, the more likely that person is to spontaneously exhibit those talents in day-to-day behaviors.Focusing on naturally powerful talents helps people use them as the foundation of strengths and enjoy personal, academic, and career success through consistent, near-perfect performance.

Below are my top five themes of talent, ranked in the order revealed by my responses to the Clifton StrengthsFinder.

How well do you think these themes describe me?
Restorative
People who are especially talented in the Restorative theme are adept at dealing with problems. They are good at figuring out what is wrong and resolving it.

Strategic
People who are especially talented in the Strategic theme create alternative ways to proceed. Faced with any given scenario, they can quickly spot the relevant patterns and issues.

Ideation
People who are especially talented in the Ideation theme are fascinated by ideas. They are able to find connections between seemingly disparate phenomena.

Individualization
People who are especially talented in the Individualization theme are intrigued with the unique qualities of each person. They have a gift for figuring out how people who are different can work together productively.

Learner
People who are especially talented in the Learner theme have a great desire to learn and want to continuously improve. In particular, the process of learning, rather than the outcome, excites them.


To learn more about the Clifton StrengthsFinder and how you can discover your top five themes, visit http://strengths.gallup.com

Thursday, June 21, 2012

A different look?

I have been spending a lot of time in Corporate Communication and have now learned about how a large business gets marketing out.
It's interesting the complex supply chains involved in something as simple as making a flyer. I have always had to do a lot of activity with limited resources, so I feel like the big-awkward monster when I'm dangling in the strings of Marketing Communications procedure... ready to run afoul a procedural step I royally messed up on.

One of these mishaps was instigated when working on putting my "poster" sessions together for University Labs.

Many Universities want to show their partnership by having posters on the wall. Normally I would send them to the University Poster Site-- and they would pick what they want-- and then we'd get it mounted and sent to them--END OF STORY.


Example Poster from the University Poster Site

So, one of my favourite University lab manager contacted me for posters.
I sent her the link to the website and waited to hear back.
After a little time I sent her a GTalk IM:

LaraS*: Hey, you find a poster you want?
gn***23: ... yeah. I could have just blow up a Selection Guide and used that.
LaraS*: There are posters in there that are actually posters...
gn***23: I think I was looking for something more personable, and relate-able-- less, showman-ship.
Plus, there's no launchpad posters-- and my students use launchpad.
LaraS*: Well, let me get back to you and see if I can get something for you.

After digging around our files and repositories-- she was right.
Today there wasn't any posters that were just about Launchpad-- and, I wasn't sure how I could make a poster created by corporate communications contractors look any less like -- corporate communications.

So I made my own.


I rather like both of them.
The funny thing is both were made with my iPhone camera, a little bit of photoshop -- and a different type set. All for probably 1/20th the designers charge TI to use stock photography images and clipart... (that as an aside).

So I sent that over to my professor.

gn***23: I love those. It doesn't reek of Corporate money.
LaraS***: You mean that it looks low-budget produced?
gn***23: No, not at all, just it is more relateable.
LaraS***: Well, printing may be an issue since it's not under the TI-Vault.
gn***23: No issue, we have large formats here-- I'm getting these up to see how the students like it.
LaraS***: Let me know :-)


Out of excitement I did what I shouldn't have done-- and shared this with one of my branding managers. Who promoptly said it had all of the wrong elecments for the brand and needed to be discontinued ASAP.

Oh well, lesson learned. If it doesn't look like the rest, we should hide it until you can't ignore it any longer.

On the bright side: at least, for right now there lives a version of this on someone's embedded processing lab-- and on this blog.

Tuesday, June 19, 2012

USB- I hate you

Let me preface this may be a bit of a rant.
After a particularly grueling day where I have been running around with my head chopped off-- only to realise that it's already 5:00, my email is overloaded and I haven't even gotten to item 4 on my epic TO DO LIST-- I had the following voicemail on my mobile (I removed his name):

"Hi, This is J_______ from University of _______, I am calling because I cannot get a response out of your e2e forum. I posted a question and didn't get someone to answer it. I am having a lot of problems with the USB that is found on the TI Launchpad. The computer doesn't seem to see that there is anything attached. I reinstalled the software. Please call me back to fix the issue with your chip and development platform." -Message left at 3:41 PM CST duration 1:44 minutes

Um...Not a yelling message, but it was definitely the calm condesending tone that an older brother would take with a younger sibling that got me irritated.
Irritation is one of those things that will quickly foul up any situation for me.
I am as transparent as they come-- so in order to still be professional--I had to take a break from the situation and  get out of my head. In particular, the irritating closing, "Please call me back to fix the issue with your chip and development platform," bit.

After typing for a few minutes (I find free writing really helps me purge nasty thoughts)-- I realised my issue.

I hate USB.

I'll clarify that I don't actually hate the standard USB, but rather the perception that it creates with certain people...
On one hand-- it's vastly convienent and a standard and everyone seems to understand it-- and on the other? It's so common and prolific that people take it's operation for granted!

Where do I think this perception came from?
... the wall outlet.
The fact that people are able to plug a USB cable into a charger and charge a device, just like they used to plug in a wall adapter-- makes them think that it's the same deal when you plug into your computer.


**Side note***It's funny because other standard interface products don't deal as much with these issues. 
Perhaps not as prolific, but you don't see HDMI wall outlets today... nor people using Ethernet cables to charge their smartphones.


More often than not, problems with Development Tools before Development happens-- are often things that can be solved with a little bit of training. 

Once upon a time, my company used to put these sorts of documents out for mass consumption:
These were vastly useful. 
Before every set of datasheets on a particular product, it would step you through the reason why that particular chip's function existed. 
Perhaps that's a different issue to be talked about on a different day-- but these types of documents are only available in pdf form now. I'm lucky that I happen to work in an office where people are constantly coming by and giving them to me (perhaps my reputation as a books hoarder precedes me). 

Although the document is slightly outdated (it only covers USB 1.1),  in preparation I was able to put together a semi-explainitory email that stepped him through checking all of the steps for why his MSP430 Launchpad was not getting picked up by his computer.

An Aside** Oddly, my approach when I am helping solve technical support issues-- comes from my mother. When I was a child, my mother used to solve every issue in the house with the process of elimination. She would ask, "WHO DID xyz". To which my sister and I would respond. If both my sister and I denied the action she would then go into, "Well, If I didn't do it. And Serena (my sister) says she didn't do it... and there are only three people in the house... then I ask you again, who did xyz?" Although it wasn't always actually the third person who lived in the house--- it was effective in getting the conversation started. **

So, with a USB problem there are three players here.
There is the Device
The Host
and the user.

So before I went digging into what would possibly be wrong with the Launchpad Development Kit's USB--- I had to go through the exercise and determine who was the most likely to blame.

1.) Tell me about your launchpad? Did you just receive it? Have you ever used it before? Did it ever work before?

2.) What type of computer are you using and what Operating System? Do you know if your drivers are up to date? (Most machines this is a given for the current operating system, but every so often, it's a custom Linux machine or it's a really old computer!)

3.) This may sound silly, but can you describe how you connected your device to the computer?
Step by Step, you got the box, opened the ESD Bag, pulled out the board--- then what?

Only 1 out of the 3 is directly my company's responsibility. The best we can do for 2 and 3 is try and make it as easy as possible. Save mandating a custom connector and a PC that we control (once upon a time Texas Instruments made PC's)-- there is a lot of extra consideration that we have to afford to be able to get one of our devices running on a computer.
That's at least 3 major operating systems, with 100's of hardware systems + multitude of drivers that are available... all things that don't deal directly with our core competency of : Making Silicon Chips...
Then-- add user error into the mix... and our platforms get a lot of blame for things that may not have been part of the initial product design. 

(I will say, we've gotten a whole lot better in solving them, but the point should be made that we have now learned how to do that after years of cranky USB issues). 

So armed with my excellent USB Guide-- Combination of the TI Bus Solutions Interface Databook (SLA067A- which is not in available anymore in data book format) and one of the best websites about USB-- Here-- I called the professor back. 

I found out he was using, the brand new launchpad I had handed him at ASEE conference, a Windows 7 HP Dell Laptop... the interesting issue was #3...
He scoffed that I asked him about the process to hook up the launchpad...
"Well, I opened the launchpad and connected it using a USB cord to the PC's USB Port."
"Did you use the cord that came with the launchpad?"
"No, I just used the one I use for my phone all the time."
"Can you do me a favour and use the one that came with the launchpad?"
"Okay..."
"I just need to know for sure that it's not the cord, USB cables sometimes are really picky..." 
I heard the computer in the background and stayed silent...
"Oh, it appears that the cable may have needed to be changed, " he drew out...
"No problem. I'm glad it's that simple... "
"I guess the phone cable I was using doesn't have the data pinned out."
"Yeah, that happens periodically, well good luck and I'm glad that the it wasn't the platform's issue!"

We ended the phone with some niceties and I sent him my preparation email anyways-- just as a reminder. If we still did databooks-- I amy have included that in my next care package to his school. 

Rant aside-- I am glad I didn't have to chase down a USB driver problem-- because that's not my area of expertise. I just wish that it wasn't so easy to blame our development kits.


Saturday, June 9, 2012

wish I could Hack my Garmin with SMS

Inspiration: 
I'm one of the most directionally challenged individuals on the planet.
Usually I am running late, sprinting to my next appointment and don't have time to pre-load my GPS with addresses.


However, when I'm in the middle of setting up my appointments, I usually take time to write down the address or put it on the outlook appointment to enter into my GPS later.
It's that later part that never happens-- until I'm in my car, headed in some general direction I think I need to be-- and distractedly trying to programme the window unit.
Why don't I use my iPhone's GPS?
1. It doesn't talk to me.
2. It requires me to have my phone dedicated to that task
3. most importantly-- I use my iPhone to check my Garmin's authority on the route (sometimes it takes you in crazy paths).

So my thought is this...
What if I was able to send an address to my Car-in mount unit Garmin from my desk?
That way if I was setting up my appointment-- I could take care of the navigation configuration on the spot.
Additionally, I have to log Mileage and it would be excellent if I could query my Garmin to my computer.
Why doesn't this exist today (as I am most likely late to get on the road to drive to San Antonio for a conference).

Overall Concept:
How to add outside communication to the HMI interface of the in-mount-GPS -- without destroying the function of the original product.
GPS, SMS, (or some transfer protocol), some proprietary standard for accessing GPS or ghosting (using the existing system, but putting a rider on it to accomplish your task).

High Level Things I need to Consider:
Does this exist today?
How accessible is the Garmin GPS OS.
What communication protocol would make the most sense.
What wireless protocol would make the most sense.
What would be the required application characterizations on both the transmitting mechanism and the recieving mechanism?
How would I handle and prioritize map loadings?
How much work would this take?
(I need to stop asking why Garmin hasn't done this already...)

Problem Statement: 
How hackable is the Garmin GPS Operating System?

Brainstorming---
I'd have to determine if the processor that runs the Garmin a custom ASIC or something that is available through other suppliers.
Regardless, I'm fairly certain that some sort of multi-core embedded processor such as the one in the Beagleboard XM or the Pandaboard is inside of one of these devices. The question will be if it's open enough try and see into it's processing.

I need to find a way to open up the device without ruining everything.

How would I program the device? Would it have headers, a memory card etc?
My GPS has up dateable OS over it's wireless networks--- or over USB (which is also an option).

How does Garmin instruct it's device to search it's address libraries and can I find a way to still use those libraries when trying to program it?

What happens if there is a mismatch, I type in "SanANtonio" instead of "San Antonio". Today Garmin does predictive suggestions, which requires querying the database at every character enter.

I'd have to find out if I could mail box the scheme...

The GPS has Bluetooth, USB and GPS links--- I wonder if there is any hidden protocols inside (some times a lot of wireless modules have multiple radios inside e.g. look at the one on the PandaBoard).

Where does the data go? I doubt that Garmin owns all of the satellites in space and instead rents them-- I wonder how accessible that is.

Is there options that perhaps if I carried the Garmin into my work place, I could program it through a cable at the desk? (Still better than having to manually input it).
Better yet, is the data stored within the GPS, can I use it post factor?

... I'd love to integrate my GPS with my address book.

This is a massive project and instead is probably only suited for research/curiosity, but interesting non-the-less.


Wednesday, June 6, 2012

You Learn Something New-- Wireless Expansion on the TI MSP-EXP430F5529


One of the kits that I like to use is the MSP-EXP430F5529 Experimenter's Board, found here: http://www.ti.com/tool/msp-exp430f5529

I've been using this board for over 2 years.
It features an MSP430F5529, which is TI's newer MSP430 line with on-board USB capabilities.
The kit itself has a simple LCD, a 3 Axis Accelerometre, On-board capacitive touch slider, 9 LED's total, two user click buttons, an Analog Thumb Wheel, Standard JTAG connection, multiple power options, SD Card Interface and connectors for a Wireless Access point.

The board comes with demos as soon as you apply power, either through the external battery interface that is provided or over the USB OTG that is on the emulator.  It has a JTAG interface should you want to use it, but also has onboard USB-Debug-Emulation so you don't need to buy an external one.

So, despite having used this board for over 2 years... I learned something new about it today!


How many wireless interfaces do you see on this board?


Here's One... where you add RF Functionality with the eZ430-RF2500T target board and have the board transmit information.

Then there is the Standard EMK Connector that can support any of the TI-Chip Con Radios and
Modules using the Sametec Connectors


You can actually have both the EMK Connected radio functioning and the add on-EZ430 target board to have access to two radios. 
Example: If you wanted to have one radio be RFID or Near Field Communication and the second Blue Tooth. So if you wanted to save power-- the NFC radio would verify the identity of the person then wake up the BlueTooth Radio to pair and associate. 


Here's a third! on the Emulation-debugger side... where you can make the board a target--- and programme it wirelessly, using the EZ430-RF2500T target board. 

But this is the one that caught me by surprise. 
 If you want to keep the target board closer to the board (less hanging parts), apparently ALL experimenter's kits put 18 pins down on the board next to the EMK connector, for this arrangement. 
This board, can be connected either through the male header pins included or by the side pin-outs to the 18 pin connection on the experimenter's board (below). 


Huh, I just found it interesting and wanted to share. 

IF you haven't ever tried this-- look at any of your MSP430 boards and look for the little six holes on the edge of the board. 
Even the launch pad has these!


Monday, June 4, 2012

Digital Measuring Tape/Odometre

#ideasforProjects

Inspiration: I got this idea watching the intern assigned to me, slide the launchpad back and forth on the desk while he was talking to me.

I really like the form-factor of the launchpad, but outside of it being... well, a Development kit, it doesn't relate well to people who don't already know what you can do with a Microcontroller.

e.g. One of the things that makes the Evalbot such a good platform is how it relates to the consumer right away. I've been looking to find something like that for the Launchpad.

So, watching this launchpad slide back and forth on the desk while my intern discussed his week's workload progress-- the idea of cemented itself.

What if we could make one of our launchpads into a fun measuring device— like a tape measure?

Overall Concept:
Distance is fairly simple to measure.
If moving in a straight line—You can also measure distance by a point of origin, knowing time and a direction.
You will also need to know the unit of measurement (inches, feet, miles etc). Maybe something like an odometer of sorts.

High Level things I need:
I’d need a processor. -Ideally this would be on a platform that could be battery powered.
I’d need a way to input point of origin (maybe a button click).
I’d need a way to count time (I am pretty sure we can use the clock cycles on the processor).
I’d need a way to know which direction I’m headed.
or I’d need to find a way to let the processor know that I’ve reached my end point (maybe another button press?)

Problem Statement: Biggest issue is that without some sort of unit of meaurement— the time is variable between users (I could click move the thing faster and end click than maybe someone else).
This person here: http://www.instructables.com/id/Digital-Measuring-Tape/ used a circle wheel.

Brainstorming--


  • Maybe I could use an accelerometre?  -- I need to look into that, are they sensitive enough to be able to pick up movement. When would measuring begin occurring and how would it differentiate between movements?
  • Does this exist already? I know there are hacks for Odometres today: http://hackaday.com/2011/01/19/make-your-own-odometer-from-scraps/ How can that example help?
  • Another idea for determining the end point--- I could use RF access points and use the broadcast strength of the nodes… Issue there is that I’d need 2 points versus just one. *granted lately I have been really fascinated with using the broadcast strength of wireless nodes as indicator as a useful measurement outside of QoS (that could be a blog post on it’s own).
Possible Solutions:
-I'd like to use the MSP430 Launchpad. It's cheap, it's got push buttons and can run off a battery pack... But the issue of determining the distance travelled or time/position seems a little complicated. This would require a hardware addition/modification-- which I'm frankly, terrible at.


-Another one is to use the Eval-Bot. It's got battery power, can run on its own.  It's wheels travel on a set timing and could count the rotations x circumference x time... and get a distance. There are bump sensors that instead of using them to detect what it runs into-- I could use the button press as a start and have the bot move forward and then the bump sensor to designate a stop. From the start to the stop would transmit the data. **appealing, because it could actually store the # of wheel turns + when it hits the bump sensor into memory-- and even to the SD Card. We could have it log it's trajectory when it started, when it hit it's bump sensor, what angle it turned and the wheel rotations then-- eventually with the bot + the travel paths you'd be able to measure the size of a room. Useful? Not sure.
Issue is that the Evalbot is normally at least 50+ dollars (on a good deal) and therefore not as attractive.

End Market:
This would be an ideal introduction to the MSP430 Launchpad to someone who just wanted proof on what a micro could do. This relates well to the mechanical/home depot DIY audience versus the Capacitive Touch Demo that is cool-- but for most non-EE/ECE degrees wouldn't imagine where they could use it. This would be a much more relate-able demo + actually be useful.

For the Evalbot? This would really be just a good Computer Science type of exercise in writing code. The peripherals are all there, just the use cases and programming needs to occur. A good lab exercise. Even better if you can transmit the information via wireless to a computer-- or find ways to optimise its path in the least amount of turns. (e.g. If you run into a 90 Degree Corner (both bump sensors activated simultaneously), the bot should assume it found a Room's Corner -- turn 180 degrees and drive straight to try and measure the room's hypotenuse).

Status:
Draft

#IdeasforProjects

inadvertently this might become a holding space for some of my project ideas that I haven't been able to get to. Perhaps it's a vain hope that someone else will be able to get some sort of inspiration out of these odd scribbled notes I have in my notebooks.

On a side note, if anyone actually WANTED to do any of these projects-- my full time job is always looking for demo's (9 out of 10 I can donate the components to would-be-hackers, but that's an aside)  For now, these are my projects that I'd like to get to/see if it can be done someday :-)

**alternatively if you see that I'm just reinventing another project that someone else has made, PLEASE share. I hate when I miss someone Else's brilliance and am working on the same concept.

Search #IdeasforProjects

Thoughts on Education- Introduction to ECE using TI EVALBOT

The below blog is a work in progress--

Setting expectations with TI's EVALBOT.

Robotics are a fantastic way to get students engaged with Electronics. I'm a particularly avid supporter of the tops down approach for students--but find myself a little conflicted in regards to Introduction to Electrical and Computer Engineering courses.

The conflict occurs when I see hardware at the Intro to Engineering courses-- that are either some version of a toy, or on a platform that a student will never encounter in Industry. It is my opinion that this is acceptable when education is compulsory (in high school or in clubs where vying for the student's attention is critical),  but at the University level and Vocational College level-- exposure should be as relevant as possible. After all, most students the purpose of going to college is to be employed when they graduate. Shouldn't the expectation be set in the very beginning to learn on platforms students would run into as engineers in the workforce?

*Side Note: The inspirational teaching model for me is the Auto Industry and how many kids become Mechanical Engineers. E.g. When a teenager gets interested in cars... he usually begins to learn about the object of his interest the car and doesn't get a golf cart first to learn on.

Not to demean platforms designed to capture interest of non-electronics audiences.

 Broad appeal platforms do exactly that-- grab people's attention! Once the attention is obtained-- then it's up to the skill of the instructor to make the associated concepts apparent to the student. Otherwise, the experience is no more effective than a structured play session... and we don't need to pay for structured education for that.

My primary concern in using toys or simplified versions of tools is this: there is the danger that the follow on courses will be so different from the safe, well structured environment that the student was exposed to-- that anything that is fairly industry standard will shock and feel like foreign world. This in turn will demotivate a student!

One of my favourite University visits was when a student who had been programming exclusively in the Arduino IDE opened up a competitor's IDE (also Eclipsed based framework) and let out, "Well, we aren't in Kansas any more." He proceeded to tell me all of the deficiencies in this framework using Arduino's simple editor as his reference point. Sadly, if he looked at TI's IDE, he would have had the same complaint or even IAR Systems (the top choice for most embedded designers).

It's expectation setting.

Teach a student that programming can happen in three clicks... and every environment after that one will feel "wrong".


However, teach a student incremental concepts that he or she can personalize/relate to-- and not only are you teaching students-- but you are also preparing them.

I am convinced that students who's first experience with hardware/software that doesn't go 100% perfect-- learn how to ask the questions to WHY certain conditions exist. Those who end up being some of the best engineers in inudstry ask, "How can we prevent this in the future?"

Taking away that real world experience? Insulates the student from common WHY? questions they would have begun to ask. Worst yet, it pushes it into after they graduate when their performance is in evaluation.

Some of my best teachers did not shield me from difficult concepts early on. In fact, many times they did not hide the difficulty of the concept, but instead used it as an opportunity to gauge my comprehension abilities. They were in essence outlining the requirements and letting me assess my own abilities against that measurement.


Let me give you an example of a course that is currently in testing phase.

At the Introduction to Electrical and Computer Engineering level- freshmen are required to take this course in conjunction with the Introduction to Engineering.


The first course consists of a video-- of this re-brained Roomba running a course.

The professor takes time to introduce the concepts that are taught in creating one of these.
Microcontroller, software, controls, programming , etc.
He ends the lecture on explaining that students by the end of their time will be able to create systems that are much more complex and fully featured.
He doesn't spend a great deal of time "dumbing" down the concepts. He uses the real terminologies and shows the actual use of the concepts. 

The second time, they are introduced to EVAL-BOT.

Perhaps the students don't understand what a Quadature Encoder is and how it functions, but the term is introduced.
I asked what was the basis of introducing these terms even though most of the students won't know what it is. He replied, "The interested students can look it up, the students that aren't will run into it later and have heard it before."
This section is about unboxing the Eval-bot and using it as is-- the finished product.


The next session is now introducing the concept of changing the fixed function that the bot shipped with.

e.g. "That's nice that the bot does this little roomba routine, but say that I wanted to tell it where to go-- how would I do that?"

Discussing what would need to happen to change the robot's function-- adding interfaces, changing the program-- then allowing the students to try it out.

*Stellaris has a neat FlashProgrammer that allows students to re-flash any of their development kits to a different demo (that has already been loaded into the FlashProgrammer) without ever having to open an IDE.  This is useful if you're not ready to introduce C Programming yet. *Refer to this blog post on how to do this Evalbot Chronos Change.

The next meeting discusses the differences between changing a function-- to being able to alter a fixed function.

This is where the concept of "configuration" is introduced. This is where students open up the IDE and get an explanation of what an IDE is, what parts make up code. They then open the code that changed the Eval-bot's function in the previous lab and see the different parts. It's here we have them configure the bot to a certain specification.
 (e.g. Change the OLED display from Micrium OS EvalBot to - I <3 ECE-)

*StellarisWare helps with this step, that the individual graphics are just function calls and to activate the display is a function call.

http://www.ti.com/tool/sw-ek-evalbot

Then, the next lab consists of customizing how the robot behaves.

The student will insert a new set of code.
Explaining what has to happen on the lowest level for the code to interact with the bot.
Guiding the student through introducing new elements.
Eg. Adding the #pause# function for the Chronos Watch- Evalbot demo-- where hitting a button on the watch lets the bot go into a waiting state. or Making the Evalbot sing the first twelve tones of the imperial march.
Walking them through this example.

Then ... have them switch examples and try it out on their own + ask questions.


Often times educators forget. These are not just high school students sitting in their intro courses. Often times these are the top 10-20% of their graduating classes with SAT scores that would put any of us to shame.
These students are highly capable and should not be underestimated. It is mastering the correct balance of introducing concepts in the right order, plus being able to explain it in a manner that makes sense to the student-- that is the responsibility of the educator.

The payback is immense-- I've seen time and time again. Just like with pre-tests, it shows students what concepts they need to learn... so they are able to discern a level of importance themselves of what they are being exposed to-- this in turn makes the experience personal.

Give the student a target.
Let the student measure themselves against that target for progress.
Don't treat the students as if they are unable to understand.
Don't overreach comprehension-- focus on the facts rather than the potential. This is a Analogue to Digital Converter. An Analogue to Digital Converter is useful in taking real world signals and making the microcontroller act upon those. Next, go into more detail at the Analogue to Digital Converter section.
Expose the Student, Demonstrate for the Student, Guide the Student then give the student space to practise on their own.
 Have high expectations-- and students will most likely strive to achieve those.

I contend that students at the Freshman ECE Engineering level are fully capable of being introduced to serious microcontrollers early on--all they need is an educator that sets the tone for them.