Before you get into this lesson, it’s important that you already have a basic understanding of common electronic components and circuits.
Schematics are symbols that help capture the essence of what a circuit is doing. They are used to show how electronic components are connected to each other, but may not necessarily reflect the physical position of a circuit. They are very similar to how we use symbols to communicate on maps
 |
| We see this on a map and know it’s a gas station without having to have a picture of the actual gas station. |
Like all languages, it’s best for you to keep a reference of what you are learning. If you find that you do not understand a particular schematic it’s encouraged for you to look it up (like a dictionary). If you aren’t sure of how the component that the particular schematic represents, it’s a good rule of thumb to seek out the component and understand how it works yourself.
Many of these resources can be found on www.rapidtables.com
So, let’s get started
Since electronic schematics evolved from electrical wiring diagrams, we will start with the wire.
It’s important to note that wires in a schematic assume almost 0 resistance, which unless noted will be the same assumption that we will be operating on.
Wires are generally shown by lines.
When wires are connected together, they are shown like this:
And when they are not connected they look like this:
You will also run into places where a wire will simply have 5V or GND labeled, it’s most often found in microcontroller schematics where power is coming from a development kit (like the LaunchPad).
Once you've identified your power sources, it’s a good starting point to start to follow the flow of electricity.

Now look at the LED symbol:


If you notice, the only difference between the LED symbol and the diode symbol is the arrows pointing out.
This is because an LED is a Diode Light is Emitted (or sent out)
Now, look at this symbol:

What direction the arrows are—this means that the diode accepts light.
This symbol is a photo diode.
Now take a look at the resistor:

 The only difference between the resistor and variable resistor is an arrow diagonally.
Take a look at this symbol and see if you can figure out what it is:
Many times schematic symbols actually LOOK like the components they represent.
See how many of these you can identify without having to look them up.

Wires are generally shown by lines.
 |
| Electrical Wire or Conductor of Current |
 |
| Connected Electrical Wires |
And when they are not connected they look like this:
 |
| Not Connected Wires |
Next- Power Sources-
One of the things that is helpful to identify is the power sources and grounds. |
Once you've identified your power sources, it’s a good starting point to start to follow the flow of electricity.
Polarized vs. Non Polarized:
Some of the schematics are directional or polarized, where it matters what direction they are placed in the circuit (diodes, transistors, motors). Others, it doesn't matter which direction the component is placed (resistors, capacitors, inductors). Sometimes schematic writers will try and help you know which direction something needs to be placed by putting a + or a – , or a dot for GND to be found where it connects with the wire.
These are symbols that are not polarized:
These are symbols that have a + or a – and need to be used correctly.
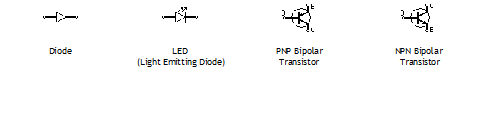
These are symbols that are not polarized:
 |
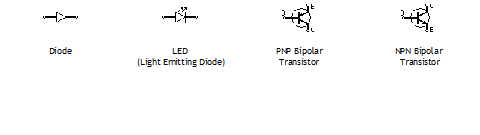
Figuring out symbols before looking them up.
Take a look at the Diode symbol:If you notice, the only difference between the LED symbol and the diode symbol is the arrows pointing out.
This is because an LED is a Diode Light is Emitted (or sent out)
Now, look at this symbol:
What direction the arrows are—this means that the diode accepts light.
This symbol is a photo diode.
Now take a look at the resistor:
And look at a variable resistor:
Take a look at this symbol and see if you can figure out what it is:
 |
| *hint, it's a capacitor* |
Many times schematic symbols actually LOOK like the components they represent.
See how many of these you can identify without having to look them up.


![LaunchPadBaseLayout-[Converted]](https://lh3.googleusercontent.com/blogger_img_proxy/AEn0k_tLznX_p9Ny3cg_UDXO9c7IgE6uS_9NQfbOM0Eu-5ngTWLHHupc2ckGzKVEi2HMYVBW94JkgPTiFltuJXuwLUNbU1SjbcVTZPrJ2cfVMUvlAn6EmnzWLkVcL5Pl7oKbo4gI=s0-d)


